English is not the most popular language in the world. In fact, according to many reports, the Chinese language (Mandarin) is certainly the most widely spoken language. In the internet community, the other popular language platforms are arguably Spanish, Russian, Arabic, Albanian, Portuguese, Malay, Italian, French, Japanese, and Korean.
Translation from English to other languages
If you have a blog written in English, it would be also nice to have a Translation Option within your blog for the non-English speaking population. There are many online translation tools, the popular free tools being AltaVista's Babel Fish translation and Google's Language Translator.
For this Language Translation Widget, I have used the Google Language Translator which enables the user to translate English website into Arabic, Chinese, French, German, Italian, Japanese, Korean, Portuguese, Russian, and Spanish. The JavaScript used here can be applied to most of the blogging sites like Blogspot, Typepad and Wordpress.
Language Translation Flags and Script
In your blogger, go to Layout -> Page Elements , click Add a Page Element to the place you want the Language Translation Widget to appear and then click on HTML/JavaScript. Enter a relevant Title such as: Language Translation and paste the following code in the content box:
Points to Note:
- If you want a slightly bigger flag, you can increase the width of the images, for example, width="30" to width="36" and the height="20" to height="24" .
- If a translation doesn't look right, you can always suggest to Google a better translation to help them improve their translation quality.
- If you do not want some translation to appear, then you simply remove that particular code!
Adding a Music Console Widget to your blogger so that the visitors can listen to your music or even to your radio station is a quite good idea, dont you think so!? It is also not as difficult as you may think but no worries, I will show you how:
Navigate to Template -> Page Elements , click Add a Page Element to the place you want the Music Console to appear and then click on HTML/JavaScript. Done so far?! Right, enter a relevant Title such as: Listen to my Music and paste the following code in the content box:
For example, using the following code:
If you like that type of music then go to [ this Site ] for more tunes!
Some explaination:
Note: The Music Console will look different depending which type of Windows Media Player you have and also on the Internet Browser for exmaple Internet Explorer or Firefox. When browsing with Firefox, the Music Console will be played in Apple player. Yep true!
Navigate to Template -> Page Elements , click Add a Page Element to the place you want the Music Console to appear and then click on HTML/JavaScript. Done so far?! Right, enter a relevant Title such as: Listen to my Music and paste the following code in the content box:
<embed autostart="false" height="40" width="300" loop="true" src="URL of music file"/></embed>
For example, using the following code:
<embed autostart="false" height="40" width="300" loop="true" src="URL of music file"/></embed>
If you like that type of music then go to [ this Site ] for more tunes!
Some explaination:
autostart="false" - it does not play the music automatically
autostart="true" - it plays the music automatically
height="40" - the height of the music console
width="300" - the width of the music console
loop="true" - it loops the music once finished
loop="false" - it does not loop the music once finished
src="URL" - the url address of the music to be played
Note: The Music Console will look different depending which type of Windows Media Player you have and also on the Internet Browser for exmaple Internet Explorer or Firefox. When browsing with Firefox, the Music Console will be played in Apple player. Yep true!
Blogger also gives you the choise of fonts and colours which you can nagivate under the Layout -> Fonts and Colors. There you will be able to change the font types, font size and also the colors but the available colors on the screen are limited. So, if you cannot find the color you want, you may want to copy the appropriate hex codes of the colors below, and paste them into the “color hex code” box.
Use the HTML Color Code Chart below:
Use the HTML Color Code Chart below:
| COLOR NAME | CODE | COLOR |
| Black | #000000 | |
| Grey0 | #150517 | |
| Grey18 | #250517 | |
| Grey21 | #2B1B17 | |
| Grey23 | #302217 | |
| Grey24 | #302226 | |
| Grey25 | #342826 | |
| Grey26 | #34282C | |
| Grey27 | #382D2C | |
| Grey28 | #3b3131 | |
| Grey29 | #3E3535 | |
| Grey30 | #413839 | |
| Grey31 | #41383C | |
| Grey32 | #463E3F | |
| Grey34 | #4A4344 | |
| Grey35 | #4C4646 | |
| Grey36 | #4E4848 | |
| Grey37 | #504A4B | |
| Grey38 | #544E4F | |
| Grey39 | #565051 | |
| Grey40 | #595454 | |
| Grey41 | #5C5858 | |
| Grey42 | #5F5A59 | |
| Grey43 | #625D5D | |
| Grey44 | #646060 | |
| Grey45 | #666362 | |
| Grey46 | #696565 | |
| Grey47 | #6D6968 | |
| Grey48 | #6E6A6B | |
| Grey49 | #726E6D | |
| Grey50 | #747170 | |
| Grey | #736F6E | |
| Slate Grey4 | #616D7E | |
| Slate Grey | #657383 | |
| Light Steel Blue4 | #646D7E | |
| Light Slate Grey | #6D7B8D | |
| Cadet Blue4 | #4C787E | |
| Dark Slate Grey4 | #4C7D7E | |
| Thistle4 | #806D7E | |
| Medium Slate Blue | #5E5A80 | |
| Medium Purple4 | #4E387E | |
| Midnight Blue | #151B54 | |
| Dark Slate Blue | #2B3856 | |
| Dark Slate Grey | #25383C | |
| Dim Grey | #463E41 | |
| Cornflower Blue | #151B8D | |
| Royal Blue4 | #15317E | |
| Slate Blue4 | #342D7E | |
| Royal Blue | #2B60DE | |
| Royal Blue1 | #306EFF | |
| Royal Blue2 | #2B65EC | |
| Royal Blue3 | #2554C7 | |
| Deep Sky Blue | #3BB9FF | |
| Deep Sky Blue2 | #38ACEC | |
| Slate Blue | #357EC7 | |
| Deep Sky Blue3 | #3090C7 | |
| Deep Sky Blue4 | #25587E | |
| Dodger Blue | #1589FF | |
| Dodger Blue2 | #157DEC | |
| Dodger Blue3 | #1569C7 | |
| Dodger Blue4 | #153E7E | |
| Steel Blue4 | #2B547E | |
| Steel Blue | #4863A0 | |
| Slate Blue2 | #6960EC | |
| Violet | #8D38C9 | |
| Medium Purple3 | #7A5DC7 | |
| Medium Purple | #8467D7 | |
| Medium Purple2 | #9172EC | |
| Medium Purple1 | #9E7BFF | |
| Light Steel Blue | #728FCE | |
| Steel Blue3 | #488AC7 | |
| Steel Blue2 | #56A5EC | |
| Steel Blue1 | #5CB3FF | |
| Sky Blue3 | #659EC7 | |
| Sky Blue4 | #41627E | |
| Slate Blue | #737CA1 | |
| Slate Grey3 | #98AFC7 | |
| Violet Red | #F6358A | |
| Violet Red2 | #E4317F | |
| Deep Pink | #F52887 | |
| Deep Pink2 | #E4287C | |
| Deep Pink3 | #C12267 | |
| Deep Pink4 | #7D053F | |
| Medium Violet Red | #CA226B | |
| Violet Red3 | #C12869 | |
| Firebrick | #800517 | |
| Violet Red4 | #7D0541 | |
| Maroon4 | #7D0552 | |
| Maroon | #810541 | |
| Maroon3 | #C12283 | |
| Maroon2 | #E3319D | |
| Maroon1 | #F535AA | |
| Magenta | #FF00FF | |
| Magenta1 | #F433FF | |
| Magenta2 | #E238EC | |
| Magenta3 | #C031C7 | |
| Medium Orchid | #B048B5 | |
| Medium Orchid1 | #D462FF | |
| Medium Orchid2 | #C45AEC | |
| Medium Orchid3 | #A74AC7 | |
| Medium Orchid4 | #6A287E | |
| Purple | #8E35EF | |
| Purple1 | #893BFF | |
| Purple2 | #7F38EC | |
| Purple3 | #6C2DC7 | |
| Purple4 | #461B7E | |
| Dark Orchid4 | #571B7E | |
| Dark Orchid | #7D1B7E | |
| Dark Violet | #842DCE | |
| Dark Orchid3 | #8B31C7 | |
| Dark Orchid2 | #A23BEC | |
| Dark Orchid1 | #B041FF | |
| Plum4 | #7E587E | |
| Pale Violet Red | #D16587 | |
| Pale Violet Red1 | #F778A1 | |
| Pale Violet Red2 | #E56E94 | |
| Pale Violet Red3 | #C25A7C | |
| Pale Violet Red4 | #7E354D | |
| Plum | #B93B8F | |
| Plum1 | #F9B7FF | |
| Plum2 | #E6A9EC | |
| Plum3 | #C38EC7 | |
| Thistle | #D2B9D3 | |
| Thistle3 | #C6AEC7 | |
| Lavendar Blush2 | #EBDDE2 | |
| Lavendar Blush3 | #C8BBBE | |
| Thistle2 | #E9CFEC | |
| Thistle1 | #FCDFFF | |
| Lavendar | #E3E4FA | |
| Lavendar Blush | #FDEEF4 | |
| Light Steel Blue1 | #C6DEFF | |
| Light Blue | #ADDFFF | |
| Light Blue1 | #BDEDFF | |
| Light Cyan | #E0FFFF | |
| Slate Grey1 | #C2DFFF | |
| Slate Grey2 | #B4CFEC | |
| Light Steel Blue2 | #B7CEEC | |
| Turquoise1 | #52F3FF | |
| Cyan | #00FFFF | |
| Cyan1 | #57FEFF | |
| Cyan2 | #50EBEC | |
| Turquoise2 | #4EE2EC | |
| Medium Turquoise | #48CCCD | |
| Turquoise | #43C6DB | |
| Dark Slate Grey1 | #9AFEFF | |
| Dark Slate Grey2 | #8EEBEC | |
| Dark Slate Grey3 | #78C7C7 | |
| Cyan3 | #46C7C7 | |
| Turquoise3 | #43BFC7 | |
| Cadet Blue3 | #77BFC7 | |
| Pale Turquoise3 | #92C7C7 | |
| Light Blue2 | #AFDCEC | |
| Dark Turquoise | #3B9C9C | |
| Cyan4 | #307D7E | |
| Light Sea Green | #3EA99F | |
| Light Sky Blue | #82CAFA | |
| Light Sky Blue2 | #A0CFEC | |
| Light Sky Blue3 | #87AFC7 | |
| Sky Blue | #82CAFF | |
| Sky Blue2 | #B0E2FF | |
| Light Sky Blue4 | #566D7E | |
| Sky Blue | #6698FF | |
| Light Slate Blue | #736AFF | |
| Light Cyan2 | #CFECEC | |
| Light Cyan3 | #AFC7C7 | |
| Light Cyan4 | #717D7D | |
| Light Blue3 | #95B9C7 | |
| Light Blue4 | #5E767E | |
| Pale Turquoise4 | #5E7D7E | |
| Dark Sea Green4 | #617C58 | |
| Medium Aquamarine | #348781 | |
| Medium Sea Green | #306754 | |
| Sea Green | #4E8975 | |
| Dark Green | #254117 | |
| Sea Green4 | #387C44 | |
| Forest Green | #4E9258 | |
| Medium Forest Green | #347235 | |
| Spring Green4 | #347C2C | |
| Dark Olive Green4 | #667C26 | |
| Chartreuse4 | #437C17 | |
| Green4 | #347C17 | |
| Medium Spring Green | #348017 | |
| Spring Green | #4AA02C | |
| Lime Green | #41A317 | |
| Spring Green | #4AA02C | |
| Dark Sea Green | #8BB381 | |
| Dark Sea Green3 | #99C68E | |
| Green3 | #4CC417 | |
| Chartreuse3 | #6CC417 | |
| Yellow Green | #52D017 | |
| Spring Green3 | #4CC552 | |
| Sea Green3 | #54C571 | |
| Spring Green2 | #57E964 | |
| Spring Green1 | #5EFB6E | |
| Sea Green2 | #64E986 | |
| Sea Green1 | #6AFB92 | |
| Dark Sea Green2 | #B5EAAA | |
| Dark Sea Green1 | #C3FDB8 | |
| Green | #00FF00 | |
| Lawn Green | #87F717 | |
| Green1 | #5FFB17 | |
| Green2 | #59E817 | |
| Chartreuse2 | #7FE817 | |
| Chartreuse | #8AFB17 | |
| Green Yellow | #B1FB17 | |
| Dark Olive Green1 | #CCFB5D | |
| Dark Olive Green2 | #BCE954 | |
| Dark Olive Green3 | #A0C544 | |
| Yellow | #FFFF00 | |
| Yellow1 | #FFFC17 | |
| Khaki1 | #FFF380 | |
| Khaki2 | #EDE275 | |
| Goldenrod | #EDDA74 | |
| Gold2 | #EAC117 | |
| Gold1 | #FDD017 | |
| Goldenrod1 | #FBB917 | |
| Goldenrod2 | #E9AB17 | |
| Gold | #D4A017 | |
| Gold3 | #C7A317 | |
| Goldenrod3 | #C68E17 | |
| Dark Goldenrod | #AF7817 | |
| Khaki | #ADA96E | |
| Khaki3 | #C9BE62 | |
| Khaki4 | #827839 | |
| Dark Goldenrod1 | #FBB117 | |
| Dark Goldenrod2 | #E8A317 | |
| Dark Goldenrod3 | #C58917 | |
| Sienna1 | #F87431 | |
| Sienna2 | #E66C2C | |
| Dark Orange | #F88017 | |
| Dark Orange1 | #F87217 | |
| Dark Orange2 | #E56717 | |
| Dark Orange3 | #C35617 | |
| Sienna3 | #C35817 | |
| Sienna | #8A4117 | |
| Sienna4 | #7E3517 | |
| Indian Red4 | #7E2217 | |
| Dark Orange3 | #7E3117 | |
| Salmon4 | #7E3817 | |
| Dark Goldenrod4 | #7F5217 | |
| Gold4 | #806517 | |
| Goldenrod4 | #805817 | |
| Light Salmon4 | #7F462C | |
| Chocolate | #C85A17 | |
| Coral3 | #C34A2C | |
| Coral2 | #E55B3C | |
| Coral | #F76541 | |
| Dark Salmon | #E18B6B | |
| Salmon1 | #F88158 | |
| Salmon2 | #E67451 | |
| Salmon3 | #C36241 | |
| Light Salmon3 | #C47451 | |
| Light Salmon2 | #E78A61 | |
| Light Salmon | #F9966B | |
| Sandy Brown | #EE9A4D | |
| Hot Pink | #F660AB | |
| Hot Pink1 | #F665AB | |
| Hot Pink2 | #E45E9D | |
| Hot Pink3 | #C25283 | |
| Hot Pink4 | #7D2252 | |
| Light Coral | #E77471 | |
| Indian Red1 | #F75D59 | |
| Indian Red2 | #E55451 | |
| Indian Red3 | #C24641 | |
| Red | #FF0000 | |
| Red1 | #F62217 | |
| Red2 | #E41B17 | |
| Firebrick1 | #F62817 | |
| Firebrick2 | #E42217 | |
| Firebrick3 | #C11B17 | |
| Pink | #FAAFBE | |
| Rosy Brown1 | #FBBBB9 | |
| Rosy Brown2 | #E8ADAA | |
| Pink2 | #E7A1B0 | |
| Light Pink | #FAAFBA | |
| Light Pink1 | #F9A7B0 | |
| Light Pink2 | #E799A3 | |
| Pink3 | #C48793 | |
| Rosy Brown3 | #C5908E | |
| Rosy Brown | #B38481 | |
| Light Pink3 | #C48189 | |
| Rosy Brown4 | #7F5A58 | |
| Light Pink4 | #7F4E52 | |
| Pink4 | #7F525D | |
| Lavendar Blush4 | #817679 | |
| Light Goldenrod4 | #817339 | |
| Lemon Chiffon4 | #827B60 | |
| Lemon Chiffon3 | #C9C299 | |
| Light Goldenrod3 | #C8B560 | |
| Light Golden2 | #ECD672 | |
| Light Goldenrod | #ECD872 | |
| Light Goldenrod1 | #FFE87C | |
| Lemon Chiffon2 | #ECE5B6 | |
| Lemon Chiffon | #FFF8C6 | |
| Light Goldenrod Yellow | #FAF8CC |
Ever wanted to post a [ Quote of a Day ] within your Blog but really knowing how to?! Well, it is not that difficult, all it requires is some JavaScript codes and vuala! Providing, you know what to do ... in this case, copy and paste will work.
The one I will demonstrate to you is a simple JavaScript which stores quotes and authors in a format called “arrays”. We all know a month has got 31 days (well more or less but we stick to 31 days) so within this javascript you can store 31 quotes which will display a new quote every day of the month.
Here we go:
Navigate to Template -> Page Elements , click Add a Page Element to the place you want your Quote of the Day to appear and then click on HTML/JavaScript.
Give it a Title Name and paste the following code into the content box:
A small explanation about the whole script & code:
I have defined a div table for the Quote of the Day to be displayed in with following atributes: 1px solid dark colour border, white background and 5 px spacing. If you do not want the table border to be displayed then there is a way of hidding it by simply replacing border:1px with border:0px and this will not show the border anymore.
Anyhow, you can of course change the border color, background color, spacing and even add other elements/atributes as you wish. If you need a list of color values, then visit the HTML Color Code Chart.
Note: When you type the quotations and names, do not use characters like " or ; and do not press “Enter” within the quotation marks as these are special characters which are used by JavaScript.
The one I will demonstrate to you is a simple JavaScript which stores quotes and authors in a format called “arrays”. We all know a month has got 31 days (well more or less but we stick to 31 days) so within this javascript you can store 31 quotes which will display a new quote every day of the month.
Here we go:
Navigate to Template -> Page Elements , click Add a Page Element to the place you want your Quote of the Day to appear and then click on HTML/JavaScript.
Give it a Title Name and paste the following code into the content box:
<div style="border:1px solid #333; background-color: #fff; padding: 4px; margin-top: 5px; font-weight: bold;">
<script language="javascript" type="text/javascript">
var d=new Date();
var quotes=new Array(31);
var authors=new Array(31);
quotes[0]="If a man watches three football games in a row, he should be declared legally dead.";
quotes[1]="Friendship is far more tragic than love. It lasts longer.";
quotes[2]="Advice is like castor oil, easy enough to give but dreadful uneasy to take.";
quotes[3]="";
quotes[4]="";
quotes[5]="";
quotes[6]="";
quotes[7]="";
quotes[8]="";
quotes[9]="";
quotes[10]="";
quotes[11]="";
quotes[12]="";
quotes[13]="";
quotes[14]="";
quotes[15]="";
quotes[16]="";
quotes[17]="";
quotes[18]="";
quotes[19]="";
quotes[20]="";
quotes[21]="";
quotes[22]="";
quotes[23]="";
quotes[24]="";
quotes[25]="";
quotes[26]="";
quotes[27]="";
quotes[28]="";
quotes[29]="";
quotes[30]="";
authors[0]="Erma Bombeck";
authors[1]="Oscar Wilde";
authors[2]="Josh Billings";
authors[3]="";
authors[4]="";
authors[5]="";
authors[6]="";
authors[7]="";
authors[8]="";
authors[9]="";
authors[10]="";
authors[11]="";
authors[12]="";
authors[13]="";
authors[14]="";
authors[15]="";
authors[16]="";
authors[17]="";
authors[18]="";
authors[19]="";
authors[20]="";
authors[21]="";
authors[22]="";
authors[23]="";
authors[24]="";
authors[25]="";
authors[26]="";
authors[27]="";
authors[28]="";
authors[29]="";
authors[30]="";
document.write(quotes[d.getDate()-1] + '<div style="text-align: right; margin-top:5px; font-style: italic;' + authors[d.getDate()-1] + '</div>');
</script>
<noscript>You need to enable JavaScript to read this.</noscript>
</div>
A small explanation about the whole script & code:
I have defined a div table for the Quote of the Day to be displayed in with following atributes: 1px solid dark colour border, white background and 5 px spacing. If you do not want the table border to be displayed then there is a way of hidding it by simply replacing border:1px with border:0px and this will not show the border anymore.
Anyhow, you can of course change the border color, background color, spacing and even add other elements/atributes as you wish. If you need a list of color values, then visit the HTML Color Code Chart.
Note: When you type the quotations and names, do not use characters like " or ; and do not press “Enter” within the quotation marks as these are special characters which are used by JavaScript.
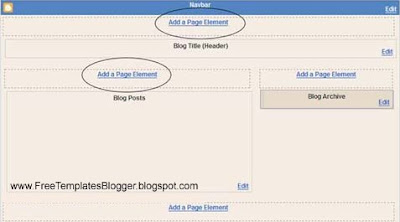
You would notice under Layout -> Page Elements that there is an option to add a Page Element to the sidebar or even to the footer [depending on your template layout] but there is none for the Header and Blog Posts. Having a Add a Page Element option for the Header and Post is a good thing because it would enable to add a new picture/banner/logo or even to add Google Adsense ad at the top or bottom of your blog posts.
How to do that ?!
Firstly you need to be logged into your blogger account and then navigate yourself to: Layout -> Edit HTML. There you will see a bunch of codes, click & tick the box: Expand Widget Templates then scroll down & or even hit key combination Ctrl + F and search for this code:
Change it to the following:
You wondering what is the difference?! Well, have a proper look and you notice showaddelement='no' and showaddelement='yes' which means no=don't show element and yes=show element! Pretty obvious lol :)
After you have changed that bit, search for:
Change that to:
Now click on Page Elements and you will see the added elements:
Aditional Add Page Elements
In some blogger templates, the Header is contained in the left sidebar and the main posts appear on the right. In such templates, you can Add Page Elements to the 'main-wrapper' but not at the Header. Nevertheless, you can still look at the guidelines below to Add Page Elements in the 'crosscol-wrapper' part of the template.
To do that, search for <div id='content-wrapper'>
and just below it you see the following:
Change showaddelement to yes:
The code should appear in all new XML Blogger templates but in case you don't see this in your template then you can add the entire code just underneath the <div id='content-wrapper'> section. Now when you view your Layout -> Page Elements, you should see the new added elements as in the picture:
Notes & Infos:
In some blogger templates, the 'header-wrapper' may be called 'header-wrap' or somehting else. In this case you will need to search of it, just search for showaddelement and you figure out the rest.
How to do that ?!
Firstly you need to be logged into your blogger account and then navigate yourself to: Layout -> Edit HTML. There you will see a bunch of codes, click & tick the box: Expand Widget Templates then scroll down & or even hit key combination Ctrl + F and search for this code:
<div id='header-wrapper'>
<b:section class='header' id='header' maxwidgets='1' showaddelement='no'>
Change it to the following:
<div id='header-wrapper'>
<b:section class='header' id='header' maxwidgets='1' showaddelement='yes'>
You wondering what is the difference?! Well, have a proper look and you notice showaddelement='no' and showaddelement='yes' which means no=don't show element and yes=show element! Pretty obvious lol :)
After you have changed that bit, search for:
<div id='main-wrapper'>
<b:section class='main' id='main' showaddelement='no'>
Change that to:
<div id='main-wrapper'>
<b:section class='main' id='main' showaddelement='yes'>
Now click on Page Elements and you will see the added elements:

Aditional Add Page Elements
In some blogger templates, the Header is contained in the left sidebar and the main posts appear on the right. In such templates, you can Add Page Elements to the 'main-wrapper' but not at the Header. Nevertheless, you can still look at the guidelines below to Add Page Elements in the 'crosscol-wrapper' part of the template.
To do that, search for <div id='content-wrapper'>
and just below it you see the following:
<div id='crosscol-wrapper' style='text-align:center'>
<b:section class='crosscol' id='crosscol' showaddelement='no'/>
</div>
Change showaddelement to yes:
<div id='crosscol-wrapper' style='text-align:center'>
<b:section class='crosscol' id='crosscol' showaddelement='yes'/>
</div>
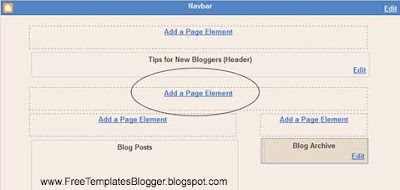
The code should appear in all new XML Blogger templates but in case you don't see this in your template then you can add the entire code just underneath the <div id='content-wrapper'> section. Now when you view your Layout -> Page Elements, you should see the new added elements as in the picture:

Notes & Infos:
In some blogger templates, the 'header-wrapper' may be called 'header-wrap' or somehting else. In this case you will need to search of it, just search for showaddelement and you figure out the rest.
What is the difference between HTML and XHTML
Probably you have seen that a lot, when modifying or inserting new codes into your Blogger template, page element, or blog post, you may have seen error one of the messages: code could not be parsed, not well-formed, broken, the elements were not closed properly etc.
I know these errors can be really frustrating and really make you go mad but in fact these errors can be corrected if you understand the rules that must be adhered to in XHTML documents [ XHTML 1.0 Strict Document Type ]. Now, I willl explain some of the XHTML syntax & rules, so that you may resolve and troubleshoot the problems if these error messages should occur while you are trying to modify the codes *meaning the XHTML Template*.
XML - HTML - XHTML
I will try to keep this short so that you guys won't get confused but just so you understand about document type: when viewing the Page Source or the Source of your Blogger template, you should see this document type declaration at the top:
The terms: XML, HTML and XHTML refer to the markup language used to write the web pages and herewith I will give a short explanation:
HTML [ Hypertext Markup Language ], invented by Tim Berners-Lee, and used since the early days of internet - as most of you guys know about it.
XML [ Extensible Markup Language ] is a meta-language, used to create other markup languages. The traditional HTML was later recast to use the rules of XML and that resulted in a new XML application, called XHTML.
XHTML [ Extensible Hypertext Markup Language ] rules are strict, unforgiving and also conforming when attempting to modify the template & codes which would result in error messages as stated above.
What are these rules that Blogger People should take note of?!
1. Basic Rules of XHTML
All codes need to be in lowercase since XML is case sensitive, all the element keywords and attribute names used in XHTML should be in the lowercase. For example, the template code is not this:
but instead it should be like this [lowercase]:
If you have noticed, the elements and attribute names between the < and > signs have to be in the lowercase. However, the value, which in this case is “Free Template Blogger Tips”, can be in the uppercase, lowercase, or mixed case.
2. Attribute values to be in quotation marks
All the attribute values have to be enclosed either in single or double quotation marks. The following example is not accepted by XHTML:
Instead, single quotation as such:
Or, double quotation as such:
3. Container elements must have closing tags
This is not acceptable:
In XHTML, there must be a closing tag with a forward slash / at the end:
Here are some other examples of the many non-empty elements that have opening and corresponding closing tags are:
4. Standalone elements to be closed
Some of the elements are empty or standalone. They do not have associated closing tags and common examples are:
In XHTML, these elements must be terminated or closed. There are two ways to do that: One way to terminate the element is to put a forward slash / at the end like this:
The second way is to add a corresponding closing tag like this:
5. Elements to be properly nested
The elements must be closed in the reverse order. This code is not accepted in XHTML:
Why is it not accepted!? Simply because, it is improperly nested! As you notice, the form was created first followed by the table and to close them in the proper order, the table must be closed before the form:
6. Document to have only one root element
In the XHTML document all the codes are nested between <html< and </html<. That's what you call a root element and all other elements or sub elements are in between. The document structure will look like this:
7. Attribute minimization is not allowed
In XHTML, all attributes should single or double quoated like this name="value". Even if the value is the same as the name, it cannot be minimized to one word. Here an two examples:
Conclusion
The next time you see an error message on your blog, take a look at your codes and see if it is well formed, well parsed, properly closed, etc. Troubleshoot the problem and try out the possible solutions as you have just learned (hopefully).
Probably you have seen that a lot, when modifying or inserting new codes into your Blogger template, page element, or blog post, you may have seen error one of the messages: code could not be parsed, not well-formed, broken, the elements were not closed properly etc.
I know these errors can be really frustrating and really make you go mad but in fact these errors can be corrected if you understand the rules that must be adhered to in XHTML documents [ XHTML 1.0 Strict Document Type ]. Now, I willl explain some of the XHTML syntax & rules, so that you may resolve and troubleshoot the problems if these error messages should occur while you are trying to modify the codes *meaning the XHTML Template*.
XML - HTML - XHTML
I will try to keep this short so that you guys won't get confused but just so you understand about document type: when viewing the Page Source or the Source of your Blogger template, you should see this document type declaration at the top:
<!DOCTYPE html PUBLIC "-//W3C//DTD XHTML 1.0 Strict//EN" "http://www.w3.org/TR/xhtml1/DTD/xhtml1-strict.dtd">
The terms: XML, HTML and XHTML refer to the markup language used to write the web pages and herewith I will give a short explanation:
HTML [ Hypertext Markup Language ], invented by Tim Berners-Lee, and used since the early days of internet - as most of you guys know about it.
XML [ Extensible Markup Language ] is a meta-language, used to create other markup languages. The traditional HTML was later recast to use the rules of XML and that resulted in a new XML application, called XHTML.
XHTML [ Extensible Hypertext Markup Language ] rules are strict, unforgiving and also conforming when attempting to modify the template & codes which would result in error messages as stated above.
What are these rules that Blogger People should take note of?!
1. Basic Rules of XHTML
- Use All Lowercase Tags
- Nest Elements Correctly
- Always UseEnd Tags
- End Empty Elements
- Use Quotes for Values
- Give Every Attribute a Value
- Use Code for Special Characters
- Use id instead of name
- Separate Styles and Scripts
- Ensure you follow those steps
All codes need to be in lowercase since XML is case sensitive, all the element keywords and attribute names used in XHTML should be in the lowercase. For example, the template code is not this:
<TITLE>Free Templates Blogger Tips and Tricks</TITLE>
but instead it should be like this [lowercase]:
<title>Free Templates Blogger Tips and Tricksc</title>
If you have noticed, the elements and attribute names between the < and > signs have to be in the lowercase. However, the value, which in this case is “Free Template Blogger Tips”, can be in the uppercase, lowercase, or mixed case.
2. Attribute values to be in quotation marks
All the attribute values have to be enclosed either in single or double quotation marks. The following example is not accepted by XHTML:
<div id=header-wrapper>
<a href=http://freetemplatesblogger.blogspot.com>The difference between HTML and XHTML</a>
<img src=photo.jpg/>
<table width=200 border=0 cellpadding=2>
Instead, single quotation as such:
<div id='header-wrapper'>
<a href='http://freetemplatesblogger.blogspot.com'>The difference between HTML and XHTML</a>
<img src='photo.jpg'/>
<table width='200' border='0' cellpadding='2'>
Or, double quotation as such:
<div id="header-wrapper">
<a href="http://freetemplatesblogger.blogspot.com">The difference between HTML and XHTML</a>
<img src="photo.jpg"/>
<table width="200" border="0" cellpadding="2">
3. Container elements must have closing tags
This is not acceptable:
<p>A paragraph
In XHTML, there must be a closing tag with a forward slash / at the end:
<p>A paragraph.></p>
Here are some other examples of the many non-empty elements that have opening and corresponding closing tags are:
<ul> ... </ul>
<li> ... </li>
<table> ... </table>
<h2> ... </h2>
<div> ... </div>
<span> ... </span>
<dt> ... </dt>
<dd> ... </dd>
<a href> ... </a>
4. Standalone elements to be closed
Some of the elements are empty or standalone. They do not have associated closing tags and common examples are:
<br>
<img>
<input>
<frame>
<hr>
<meta>
<link>
In XHTML, these elements must be terminated or closed. There are two ways to do that: One way to terminate the element is to put a forward slash / at the end like this:
<br/>
<img/>
<input/>
<frame/>
<hr/>
<meta/>
<link/>
The second way is to add a corresponding closing tag like this:
<br> ... </br>
<img> ... </img>
<input> ... </input>
<frame> ... </frame>
<hr> ... </hr>
<meta> ... </meta>
<link> ... </link>
5. Elements to be properly nested
The elements must be closed in the reverse order. This code is not accepted in XHTML:
<form><table> ... </form></table>
Why is it not accepted!? Simply because, it is improperly nested! As you notice, the form was created first followed by the table and to close them in the proper order, the table must be closed before the form:
<form><table> ... </table></form>
6. Document to have only one root element
In the XHTML document all the codes are nested between <html< and </html<. That's what you call a root element and all other elements or sub elements are in between. The document structure will look like this:
<html>
<head> ... </head>
<body> ... </body>
</html>
7. Attribute minimization is not allowed
In XHTML, all attributes should single or double quoated like this name="value". Even if the value is the same as the name, it cannot be minimized to one word. Here an two examples:
<textarea readonly>Hyperlink Code</textarea>
<textarea readonly="readonly">Hyperlink Code</textarea>
Conclusion
The next time you see an error message on your blog, take a look at your codes and see if it is well formed, well parsed, properly closed, etc. Troubleshoot the problem and try out the possible solutions as you have just learned (hopefully).
Subscribe to:
Posts (Atom)