English is not the most popular language in the world. In fact, according to many reports, the Chinese language (Mandarin) is certainly the most widely spoken language. In the internet community, the other popular language platforms are arguably Spanish, Russian, Arabic, Albanian, Portuguese, Malay, Italian, French, Japanese, and Korean.
Translation from English to other languages
If you have a blog written in English, it would be also nice to have a Translation Option within your blog for the non-English speaking population. There are many online translation tools, the popular free tools being AltaVista's Babel Fish translation and Google's Language Translator.
For this Language Translation Widget, I have used the Google Language Translator which enables the user to translate English website into Arabic, Chinese, French, German, Italian, Japanese, Korean, Portuguese, Russian, and Spanish. The JavaScript used here can be applied to most of the blogging sites like Blogspot, Typepad and Wordpress.
Language Translation Flags and Script
In your blogger, go to Layout -> Page Elements , click Add a Page Element to the place you want the Language Translation Widget to appear and then click on HTML/JavaScript. Enter a relevant Title such as: Language Translation and paste the following code in the content box:
Points to Note:
- If you want a slightly bigger flag, you can increase the width of the images, for example, width="30" to width="36" and the height="20" to height="24" .
- If a translation doesn't look right, you can always suggest to Google a better translation to help them improve their translation quality.
- If you do not want some translation to appear, then you simply remove that particular code!
Adding a Music Console Widget to your blogger so that the visitors can listen to your music or even to your radio station is a quite good idea, dont you think so!? It is also not as difficult as you may think but no worries, I will show you how:
Navigate to Template -> Page Elements , click Add a Page Element to the place you want the Music Console to appear and then click on HTML/JavaScript. Done so far?! Right, enter a relevant Title such as: Listen to my Music and paste the following code in the content box:
For example, using the following code:
If you like that type of music then go to [ this Site ] for more tunes!
Some explaination:
Note: The Music Console will look different depending which type of Windows Media Player you have and also on the Internet Browser for exmaple Internet Explorer or Firefox. When browsing with Firefox, the Music Console will be played in Apple player. Yep true!
Navigate to Template -> Page Elements , click Add a Page Element to the place you want the Music Console to appear and then click on HTML/JavaScript. Done so far?! Right, enter a relevant Title such as: Listen to my Music and paste the following code in the content box:
<embed autostart="false" height="40" width="300" loop="true" src="URL of music file"/></embed>
For example, using the following code:
<embed autostart="false" height="40" width="300" loop="true" src="URL of music file"/></embed>
If you like that type of music then go to [ this Site ] for more tunes!
Some explaination:
autostart="false" - it does not play the music automatically
autostart="true" - it plays the music automatically
height="40" - the height of the music console
width="300" - the width of the music console
loop="true" - it loops the music once finished
loop="false" - it does not loop the music once finished
src="URL" - the url address of the music to be played
Note: The Music Console will look different depending which type of Windows Media Player you have and also on the Internet Browser for exmaple Internet Explorer or Firefox. When browsing with Firefox, the Music Console will be played in Apple player. Yep true!
Blogger also gives you the choise of fonts and colours which you can nagivate under the Layout -> Fonts and Colors. There you will be able to change the font types, font size and also the colors but the available colors on the screen are limited. So, if you cannot find the color you want, you may want to copy the appropriate hex codes of the colors below, and paste them into the “color hex code” box.
Use the HTML Color Code Chart below:
Use the HTML Color Code Chart below:
| COLOR NAME | CODE | COLOR |
| Black | #000000 | |
| Grey0 | #150517 | |
| Grey18 | #250517 | |
| Grey21 | #2B1B17 | |
| Grey23 | #302217 | |
| Grey24 | #302226 | |
| Grey25 | #342826 | |
| Grey26 | #34282C | |
| Grey27 | #382D2C | |
| Grey28 | #3b3131 | |
| Grey29 | #3E3535 | |
| Grey30 | #413839 | |
| Grey31 | #41383C | |
| Grey32 | #463E3F | |
| Grey34 | #4A4344 | |
| Grey35 | #4C4646 | |
| Grey36 | #4E4848 | |
| Grey37 | #504A4B | |
| Grey38 | #544E4F | |
| Grey39 | #565051 | |
| Grey40 | #595454 | |
| Grey41 | #5C5858 | |
| Grey42 | #5F5A59 | |
| Grey43 | #625D5D | |
| Grey44 | #646060 | |
| Grey45 | #666362 | |
| Grey46 | #696565 | |
| Grey47 | #6D6968 | |
| Grey48 | #6E6A6B | |
| Grey49 | #726E6D | |
| Grey50 | #747170 | |
| Grey | #736F6E | |
| Slate Grey4 | #616D7E | |
| Slate Grey | #657383 | |
| Light Steel Blue4 | #646D7E | |
| Light Slate Grey | #6D7B8D | |
| Cadet Blue4 | #4C787E | |
| Dark Slate Grey4 | #4C7D7E | |
| Thistle4 | #806D7E | |
| Medium Slate Blue | #5E5A80 | |
| Medium Purple4 | #4E387E | |
| Midnight Blue | #151B54 | |
| Dark Slate Blue | #2B3856 | |
| Dark Slate Grey | #25383C | |
| Dim Grey | #463E41 | |
| Cornflower Blue | #151B8D | |
| Royal Blue4 | #15317E | |
| Slate Blue4 | #342D7E | |
| Royal Blue | #2B60DE | |
| Royal Blue1 | #306EFF | |
| Royal Blue2 | #2B65EC | |
| Royal Blue3 | #2554C7 | |
| Deep Sky Blue | #3BB9FF | |
| Deep Sky Blue2 | #38ACEC | |
| Slate Blue | #357EC7 | |
| Deep Sky Blue3 | #3090C7 | |
| Deep Sky Blue4 | #25587E | |
| Dodger Blue | #1589FF | |
| Dodger Blue2 | #157DEC | |
| Dodger Blue3 | #1569C7 | |
| Dodger Blue4 | #153E7E | |
| Steel Blue4 | #2B547E | |
| Steel Blue | #4863A0 | |
| Slate Blue2 | #6960EC | |
| Violet | #8D38C9 | |
| Medium Purple3 | #7A5DC7 | |
| Medium Purple | #8467D7 | |
| Medium Purple2 | #9172EC | |
| Medium Purple1 | #9E7BFF | |
| Light Steel Blue | #728FCE | |
| Steel Blue3 | #488AC7 | |
| Steel Blue2 | #56A5EC | |
| Steel Blue1 | #5CB3FF | |
| Sky Blue3 | #659EC7 | |
| Sky Blue4 | #41627E | |
| Slate Blue | #737CA1 | |
| Slate Grey3 | #98AFC7 | |
| Violet Red | #F6358A | |
| Violet Red2 | #E4317F | |
| Deep Pink | #F52887 | |
| Deep Pink2 | #E4287C | |
| Deep Pink3 | #C12267 | |
| Deep Pink4 | #7D053F | |
| Medium Violet Red | #CA226B | |
| Violet Red3 | #C12869 | |
| Firebrick | #800517 | |
| Violet Red4 | #7D0541 | |
| Maroon4 | #7D0552 | |
| Maroon | #810541 | |
| Maroon3 | #C12283 | |
| Maroon2 | #E3319D | |
| Maroon1 | #F535AA | |
| Magenta | #FF00FF | |
| Magenta1 | #F433FF | |
| Magenta2 | #E238EC | |
| Magenta3 | #C031C7 | |
| Medium Orchid | #B048B5 | |
| Medium Orchid1 | #D462FF | |
| Medium Orchid2 | #C45AEC | |
| Medium Orchid3 | #A74AC7 | |
| Medium Orchid4 | #6A287E | |
| Purple | #8E35EF | |
| Purple1 | #893BFF | |
| Purple2 | #7F38EC | |
| Purple3 | #6C2DC7 | |
| Purple4 | #461B7E | |
| Dark Orchid4 | #571B7E | |
| Dark Orchid | #7D1B7E | |
| Dark Violet | #842DCE | |
| Dark Orchid3 | #8B31C7 | |
| Dark Orchid2 | #A23BEC | |
| Dark Orchid1 | #B041FF | |
| Plum4 | #7E587E | |
| Pale Violet Red | #D16587 | |
| Pale Violet Red1 | #F778A1 | |
| Pale Violet Red2 | #E56E94 | |
| Pale Violet Red3 | #C25A7C | |
| Pale Violet Red4 | #7E354D | |
| Plum | #B93B8F | |
| Plum1 | #F9B7FF | |
| Plum2 | #E6A9EC | |
| Plum3 | #C38EC7 | |
| Thistle | #D2B9D3 | |
| Thistle3 | #C6AEC7 | |
| Lavendar Blush2 | #EBDDE2 | |
| Lavendar Blush3 | #C8BBBE | |
| Thistle2 | #E9CFEC | |
| Thistle1 | #FCDFFF | |
| Lavendar | #E3E4FA | |
| Lavendar Blush | #FDEEF4 | |
| Light Steel Blue1 | #C6DEFF | |
| Light Blue | #ADDFFF | |
| Light Blue1 | #BDEDFF | |
| Light Cyan | #E0FFFF | |
| Slate Grey1 | #C2DFFF | |
| Slate Grey2 | #B4CFEC | |
| Light Steel Blue2 | #B7CEEC | |
| Turquoise1 | #52F3FF | |
| Cyan | #00FFFF | |
| Cyan1 | #57FEFF | |
| Cyan2 | #50EBEC | |
| Turquoise2 | #4EE2EC | |
| Medium Turquoise | #48CCCD | |
| Turquoise | #43C6DB | |
| Dark Slate Grey1 | #9AFEFF | |
| Dark Slate Grey2 | #8EEBEC | |
| Dark Slate Grey3 | #78C7C7 | |
| Cyan3 | #46C7C7 | |
| Turquoise3 | #43BFC7 | |
| Cadet Blue3 | #77BFC7 | |
| Pale Turquoise3 | #92C7C7 | |
| Light Blue2 | #AFDCEC | |
| Dark Turquoise | #3B9C9C | |
| Cyan4 | #307D7E | |
| Light Sea Green | #3EA99F | |
| Light Sky Blue | #82CAFA | |
| Light Sky Blue2 | #A0CFEC | |
| Light Sky Blue3 | #87AFC7 | |
| Sky Blue | #82CAFF | |
| Sky Blue2 | #B0E2FF | |
| Light Sky Blue4 | #566D7E | |
| Sky Blue | #6698FF | |
| Light Slate Blue | #736AFF | |
| Light Cyan2 | #CFECEC | |
| Light Cyan3 | #AFC7C7 | |
| Light Cyan4 | #717D7D | |
| Light Blue3 | #95B9C7 | |
| Light Blue4 | #5E767E | |
| Pale Turquoise4 | #5E7D7E | |
| Dark Sea Green4 | #617C58 | |
| Medium Aquamarine | #348781 | |
| Medium Sea Green | #306754 | |
| Sea Green | #4E8975 | |
| Dark Green | #254117 | |
| Sea Green4 | #387C44 | |
| Forest Green | #4E9258 | |
| Medium Forest Green | #347235 | |
| Spring Green4 | #347C2C | |
| Dark Olive Green4 | #667C26 | |
| Chartreuse4 | #437C17 | |
| Green4 | #347C17 | |
| Medium Spring Green | #348017 | |
| Spring Green | #4AA02C | |
| Lime Green | #41A317 | |
| Spring Green | #4AA02C | |
| Dark Sea Green | #8BB381 | |
| Dark Sea Green3 | #99C68E | |
| Green3 | #4CC417 | |
| Chartreuse3 | #6CC417 | |
| Yellow Green | #52D017 | |
| Spring Green3 | #4CC552 | |
| Sea Green3 | #54C571 | |
| Spring Green2 | #57E964 | |
| Spring Green1 | #5EFB6E | |
| Sea Green2 | #64E986 | |
| Sea Green1 | #6AFB92 | |
| Dark Sea Green2 | #B5EAAA | |
| Dark Sea Green1 | #C3FDB8 | |
| Green | #00FF00 | |
| Lawn Green | #87F717 | |
| Green1 | #5FFB17 | |
| Green2 | #59E817 | |
| Chartreuse2 | #7FE817 | |
| Chartreuse | #8AFB17 | |
| Green Yellow | #B1FB17 | |
| Dark Olive Green1 | #CCFB5D | |
| Dark Olive Green2 | #BCE954 | |
| Dark Olive Green3 | #A0C544 | |
| Yellow | #FFFF00 | |
| Yellow1 | #FFFC17 | |
| Khaki1 | #FFF380 | |
| Khaki2 | #EDE275 | |
| Goldenrod | #EDDA74 | |
| Gold2 | #EAC117 | |
| Gold1 | #FDD017 | |
| Goldenrod1 | #FBB917 | |
| Goldenrod2 | #E9AB17 | |
| Gold | #D4A017 | |
| Gold3 | #C7A317 | |
| Goldenrod3 | #C68E17 | |
| Dark Goldenrod | #AF7817 | |
| Khaki | #ADA96E | |
| Khaki3 | #C9BE62 | |
| Khaki4 | #827839 | |
| Dark Goldenrod1 | #FBB117 | |
| Dark Goldenrod2 | #E8A317 | |
| Dark Goldenrod3 | #C58917 | |
| Sienna1 | #F87431 | |
| Sienna2 | #E66C2C | |
| Dark Orange | #F88017 | |
| Dark Orange1 | #F87217 | |
| Dark Orange2 | #E56717 | |
| Dark Orange3 | #C35617 | |
| Sienna3 | #C35817 | |
| Sienna | #8A4117 | |
| Sienna4 | #7E3517 | |
| Indian Red4 | #7E2217 | |
| Dark Orange3 | #7E3117 | |
| Salmon4 | #7E3817 | |
| Dark Goldenrod4 | #7F5217 | |
| Gold4 | #806517 | |
| Goldenrod4 | #805817 | |
| Light Salmon4 | #7F462C | |
| Chocolate | #C85A17 | |
| Coral3 | #C34A2C | |
| Coral2 | #E55B3C | |
| Coral | #F76541 | |
| Dark Salmon | #E18B6B | |
| Salmon1 | #F88158 | |
| Salmon2 | #E67451 | |
| Salmon3 | #C36241 | |
| Light Salmon3 | #C47451 | |
| Light Salmon2 | #E78A61 | |
| Light Salmon | #F9966B | |
| Sandy Brown | #EE9A4D | |
| Hot Pink | #F660AB | |
| Hot Pink1 | #F665AB | |
| Hot Pink2 | #E45E9D | |
| Hot Pink3 | #C25283 | |
| Hot Pink4 | #7D2252 | |
| Light Coral | #E77471 | |
| Indian Red1 | #F75D59 | |
| Indian Red2 | #E55451 | |
| Indian Red3 | #C24641 | |
| Red | #FF0000 | |
| Red1 | #F62217 | |
| Red2 | #E41B17 | |
| Firebrick1 | #F62817 | |
| Firebrick2 | #E42217 | |
| Firebrick3 | #C11B17 | |
| Pink | #FAAFBE | |
| Rosy Brown1 | #FBBBB9 | |
| Rosy Brown2 | #E8ADAA | |
| Pink2 | #E7A1B0 | |
| Light Pink | #FAAFBA | |
| Light Pink1 | #F9A7B0 | |
| Light Pink2 | #E799A3 | |
| Pink3 | #C48793 | |
| Rosy Brown3 | #C5908E | |
| Rosy Brown | #B38481 | |
| Light Pink3 | #C48189 | |
| Rosy Brown4 | #7F5A58 | |
| Light Pink4 | #7F4E52 | |
| Pink4 | #7F525D | |
| Lavendar Blush4 | #817679 | |
| Light Goldenrod4 | #817339 | |
| Lemon Chiffon4 | #827B60 | |
| Lemon Chiffon3 | #C9C299 | |
| Light Goldenrod3 | #C8B560 | |
| Light Golden2 | #ECD672 | |
| Light Goldenrod | #ECD872 | |
| Light Goldenrod1 | #FFE87C | |
| Lemon Chiffon2 | #ECE5B6 | |
| Lemon Chiffon | #FFF8C6 | |
| Light Goldenrod Yellow | #FAF8CC |
Ever wanted to post a [ Quote of a Day ] within your Blog but really knowing how to?! Well, it is not that difficult, all it requires is some JavaScript codes and vuala! Providing, you know what to do ... in this case, copy and paste will work.
The one I will demonstrate to you is a simple JavaScript which stores quotes and authors in a format called “arrays”. We all know a month has got 31 days (well more or less but we stick to 31 days) so within this javascript you can store 31 quotes which will display a new quote every day of the month.
Here we go:
Navigate to Template -> Page Elements , click Add a Page Element to the place you want your Quote of the Day to appear and then click on HTML/JavaScript.
Give it a Title Name and paste the following code into the content box:
A small explanation about the whole script & code:
I have defined a div table for the Quote of the Day to be displayed in with following atributes: 1px solid dark colour border, white background and 5 px spacing. If you do not want the table border to be displayed then there is a way of hidding it by simply replacing border:1px with border:0px and this will not show the border anymore.
Anyhow, you can of course change the border color, background color, spacing and even add other elements/atributes as you wish. If you need a list of color values, then visit the HTML Color Code Chart.
Note: When you type the quotations and names, do not use characters like " or ; and do not press “Enter” within the quotation marks as these are special characters which are used by JavaScript.
The one I will demonstrate to you is a simple JavaScript which stores quotes and authors in a format called “arrays”. We all know a month has got 31 days (well more or less but we stick to 31 days) so within this javascript you can store 31 quotes which will display a new quote every day of the month.
Here we go:
Navigate to Template -> Page Elements , click Add a Page Element to the place you want your Quote of the Day to appear and then click on HTML/JavaScript.
Give it a Title Name and paste the following code into the content box:
<div style="border:1px solid #333; background-color: #fff; padding: 4px; margin-top: 5px; font-weight: bold;">
<script language="javascript" type="text/javascript">
var d=new Date();
var quotes=new Array(31);
var authors=new Array(31);
quotes[0]="If a man watches three football games in a row, he should be declared legally dead.";
quotes[1]="Friendship is far more tragic than love. It lasts longer.";
quotes[2]="Advice is like castor oil, easy enough to give but dreadful uneasy to take.";
quotes[3]="";
quotes[4]="";
quotes[5]="";
quotes[6]="";
quotes[7]="";
quotes[8]="";
quotes[9]="";
quotes[10]="";
quotes[11]="";
quotes[12]="";
quotes[13]="";
quotes[14]="";
quotes[15]="";
quotes[16]="";
quotes[17]="";
quotes[18]="";
quotes[19]="";
quotes[20]="";
quotes[21]="";
quotes[22]="";
quotes[23]="";
quotes[24]="";
quotes[25]="";
quotes[26]="";
quotes[27]="";
quotes[28]="";
quotes[29]="";
quotes[30]="";
authors[0]="Erma Bombeck";
authors[1]="Oscar Wilde";
authors[2]="Josh Billings";
authors[3]="";
authors[4]="";
authors[5]="";
authors[6]="";
authors[7]="";
authors[8]="";
authors[9]="";
authors[10]="";
authors[11]="";
authors[12]="";
authors[13]="";
authors[14]="";
authors[15]="";
authors[16]="";
authors[17]="";
authors[18]="";
authors[19]="";
authors[20]="";
authors[21]="";
authors[22]="";
authors[23]="";
authors[24]="";
authors[25]="";
authors[26]="";
authors[27]="";
authors[28]="";
authors[29]="";
authors[30]="";
document.write(quotes[d.getDate()-1] + '<div style="text-align: right; margin-top:5px; font-style: italic;' + authors[d.getDate()-1] + '</div>');
</script>
<noscript>You need to enable JavaScript to read this.</noscript>
</div>
A small explanation about the whole script & code:
I have defined a div table for the Quote of the Day to be displayed in with following atributes: 1px solid dark colour border, white background and 5 px spacing. If you do not want the table border to be displayed then there is a way of hidding it by simply replacing border:1px with border:0px and this will not show the border anymore.
Anyhow, you can of course change the border color, background color, spacing and even add other elements/atributes as you wish. If you need a list of color values, then visit the HTML Color Code Chart.
Note: When you type the quotations and names, do not use characters like " or ; and do not press “Enter” within the quotation marks as these are special characters which are used by JavaScript.
You would notice under Layout -> Page Elements that there is an option to add a Page Element to the sidebar or even to the footer [depending on your template layout] but there is none for the Header and Blog Posts. Having a Add a Page Element option for the Header and Post is a good thing because it would enable to add a new picture/banner/logo or even to add Google Adsense ad at the top or bottom of your blog posts.
How to do that ?!
Firstly you need to be logged into your blogger account and then navigate yourself to: Layout -> Edit HTML. There you will see a bunch of codes, click & tick the box: Expand Widget Templates then scroll down & or even hit key combination Ctrl + F and search for this code:
Change it to the following:
You wondering what is the difference?! Well, have a proper look and you notice showaddelement='no' and showaddelement='yes' which means no=don't show element and yes=show element! Pretty obvious lol :)
After you have changed that bit, search for:
Change that to:
Now click on Page Elements and you will see the added elements:
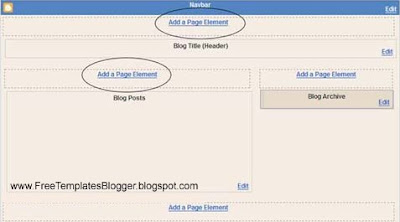
Aditional Add Page Elements
In some blogger templates, the Header is contained in the left sidebar and the main posts appear on the right. In such templates, you can Add Page Elements to the 'main-wrapper' but not at the Header. Nevertheless, you can still look at the guidelines below to Add Page Elements in the 'crosscol-wrapper' part of the template.
To do that, search for <div id='content-wrapper'>
and just below it you see the following:
Change showaddelement to yes:
The code should appear in all new XML Blogger templates but in case you don't see this in your template then you can add the entire code just underneath the <div id='content-wrapper'> section. Now when you view your Layout -> Page Elements, you should see the new added elements as in the picture:
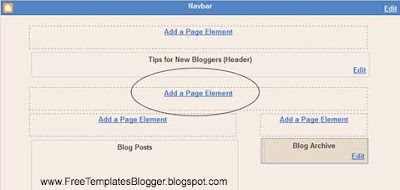
Notes & Infos:
In some blogger templates, the 'header-wrapper' may be called 'header-wrap' or somehting else. In this case you will need to search of it, just search for showaddelement and you figure out the rest.
How to do that ?!
Firstly you need to be logged into your blogger account and then navigate yourself to: Layout -> Edit HTML. There you will see a bunch of codes, click & tick the box: Expand Widget Templates then scroll down & or even hit key combination Ctrl + F and search for this code:
<div id='header-wrapper'>
<b:section class='header' id='header' maxwidgets='1' showaddelement='no'>
Change it to the following:
<div id='header-wrapper'>
<b:section class='header' id='header' maxwidgets='1' showaddelement='yes'>
You wondering what is the difference?! Well, have a proper look and you notice showaddelement='no' and showaddelement='yes' which means no=don't show element and yes=show element! Pretty obvious lol :)
After you have changed that bit, search for:
<div id='main-wrapper'>
<b:section class='main' id='main' showaddelement='no'>
Change that to:
<div id='main-wrapper'>
<b:section class='main' id='main' showaddelement='yes'>
Now click on Page Elements and you will see the added elements:

Aditional Add Page Elements
In some blogger templates, the Header is contained in the left sidebar and the main posts appear on the right. In such templates, you can Add Page Elements to the 'main-wrapper' but not at the Header. Nevertheless, you can still look at the guidelines below to Add Page Elements in the 'crosscol-wrapper' part of the template.
To do that, search for <div id='content-wrapper'>
and just below it you see the following:
<div id='crosscol-wrapper' style='text-align:center'>
<b:section class='crosscol' id='crosscol' showaddelement='no'/>
</div>
Change showaddelement to yes:
<div id='crosscol-wrapper' style='text-align:center'>
<b:section class='crosscol' id='crosscol' showaddelement='yes'/>
</div>
The code should appear in all new XML Blogger templates but in case you don't see this in your template then you can add the entire code just underneath the <div id='content-wrapper'> section. Now when you view your Layout -> Page Elements, you should see the new added elements as in the picture:

Notes & Infos:
In some blogger templates, the 'header-wrapper' may be called 'header-wrap' or somehting else. In this case you will need to search of it, just search for showaddelement and you figure out the rest.
What is the difference between HTML and XHTML
Probably you have seen that a lot, when modifying or inserting new codes into your Blogger template, page element, or blog post, you may have seen error one of the messages: code could not be parsed, not well-formed, broken, the elements were not closed properly etc.
I know these errors can be really frustrating and really make you go mad but in fact these errors can be corrected if you understand the rules that must be adhered to in XHTML documents [ XHTML 1.0 Strict Document Type ]. Now, I willl explain some of the XHTML syntax & rules, so that you may resolve and troubleshoot the problems if these error messages should occur while you are trying to modify the codes *meaning the XHTML Template*.
XML - HTML - XHTML
I will try to keep this short so that you guys won't get confused but just so you understand about document type: when viewing the Page Source or the Source of your Blogger template, you should see this document type declaration at the top:
The terms: XML, HTML and XHTML refer to the markup language used to write the web pages and herewith I will give a short explanation:
HTML [ Hypertext Markup Language ], invented by Tim Berners-Lee, and used since the early days of internet - as most of you guys know about it.
XML [ Extensible Markup Language ] is a meta-language, used to create other markup languages. The traditional HTML was later recast to use the rules of XML and that resulted in a new XML application, called XHTML.
XHTML [ Extensible Hypertext Markup Language ] rules are strict, unforgiving and also conforming when attempting to modify the template & codes which would result in error messages as stated above.
What are these rules that Blogger People should take note of?!
1. Basic Rules of XHTML
All codes need to be in lowercase since XML is case sensitive, all the element keywords and attribute names used in XHTML should be in the lowercase. For example, the template code is not this:
but instead it should be like this [lowercase]:
If you have noticed, the elements and attribute names between the < and > signs have to be in the lowercase. However, the value, which in this case is “Free Template Blogger Tips”, can be in the uppercase, lowercase, or mixed case.
2. Attribute values to be in quotation marks
All the attribute values have to be enclosed either in single or double quotation marks. The following example is not accepted by XHTML:
Instead, single quotation as such:
Or, double quotation as such:
3. Container elements must have closing tags
This is not acceptable:
In XHTML, there must be a closing tag with a forward slash / at the end:
Here are some other examples of the many non-empty elements that have opening and corresponding closing tags are:
4. Standalone elements to be closed
Some of the elements are empty or standalone. They do not have associated closing tags and common examples are:
In XHTML, these elements must be terminated or closed. There are two ways to do that: One way to terminate the element is to put a forward slash / at the end like this:
The second way is to add a corresponding closing tag like this:
5. Elements to be properly nested
The elements must be closed in the reverse order. This code is not accepted in XHTML:
Why is it not accepted!? Simply because, it is improperly nested! As you notice, the form was created first followed by the table and to close them in the proper order, the table must be closed before the form:
6. Document to have only one root element
In the XHTML document all the codes are nested between <html< and </html<. That's what you call a root element and all other elements or sub elements are in between. The document structure will look like this:
7. Attribute minimization is not allowed
In XHTML, all attributes should single or double quoated like this name="value". Even if the value is the same as the name, it cannot be minimized to one word. Here an two examples:
Conclusion
The next time you see an error message on your blog, take a look at your codes and see if it is well formed, well parsed, properly closed, etc. Troubleshoot the problem and try out the possible solutions as you have just learned (hopefully).
Probably you have seen that a lot, when modifying or inserting new codes into your Blogger template, page element, or blog post, you may have seen error one of the messages: code could not be parsed, not well-formed, broken, the elements were not closed properly etc.
I know these errors can be really frustrating and really make you go mad but in fact these errors can be corrected if you understand the rules that must be adhered to in XHTML documents [ XHTML 1.0 Strict Document Type ]. Now, I willl explain some of the XHTML syntax & rules, so that you may resolve and troubleshoot the problems if these error messages should occur while you are trying to modify the codes *meaning the XHTML Template*.
XML - HTML - XHTML
I will try to keep this short so that you guys won't get confused but just so you understand about document type: when viewing the Page Source or the Source of your Blogger template, you should see this document type declaration at the top:
<!DOCTYPE html PUBLIC "-//W3C//DTD XHTML 1.0 Strict//EN" "http://www.w3.org/TR/xhtml1/DTD/xhtml1-strict.dtd">
The terms: XML, HTML and XHTML refer to the markup language used to write the web pages and herewith I will give a short explanation:
HTML [ Hypertext Markup Language ], invented by Tim Berners-Lee, and used since the early days of internet - as most of you guys know about it.
XML [ Extensible Markup Language ] is a meta-language, used to create other markup languages. The traditional HTML was later recast to use the rules of XML and that resulted in a new XML application, called XHTML.
XHTML [ Extensible Hypertext Markup Language ] rules are strict, unforgiving and also conforming when attempting to modify the template & codes which would result in error messages as stated above.
What are these rules that Blogger People should take note of?!
1. Basic Rules of XHTML
- Use All Lowercase Tags
- Nest Elements Correctly
- Always UseEnd Tags
- End Empty Elements
- Use Quotes for Values
- Give Every Attribute a Value
- Use Code for Special Characters
- Use id instead of name
- Separate Styles and Scripts
- Ensure you follow those steps
All codes need to be in lowercase since XML is case sensitive, all the element keywords and attribute names used in XHTML should be in the lowercase. For example, the template code is not this:
<TITLE>Free Templates Blogger Tips and Tricks</TITLE>
but instead it should be like this [lowercase]:
<title>Free Templates Blogger Tips and Tricksc</title>
If you have noticed, the elements and attribute names between the < and > signs have to be in the lowercase. However, the value, which in this case is “Free Template Blogger Tips”, can be in the uppercase, lowercase, or mixed case.
2. Attribute values to be in quotation marks
All the attribute values have to be enclosed either in single or double quotation marks. The following example is not accepted by XHTML:
<div id=header-wrapper>
<a href=http://freetemplatesblogger.blogspot.com>The difference between HTML and XHTML</a>
<img src=photo.jpg/>
<table width=200 border=0 cellpadding=2>
Instead, single quotation as such:
<div id='header-wrapper'>
<a href='http://freetemplatesblogger.blogspot.com'>The difference between HTML and XHTML</a>
<img src='photo.jpg'/>
<table width='200' border='0' cellpadding='2'>
Or, double quotation as such:
<div id="header-wrapper">
<a href="http://freetemplatesblogger.blogspot.com">The difference between HTML and XHTML</a>
<img src="photo.jpg"/>
<table width="200" border="0" cellpadding="2">
3. Container elements must have closing tags
This is not acceptable:
<p>A paragraph
In XHTML, there must be a closing tag with a forward slash / at the end:
<p>A paragraph.></p>
Here are some other examples of the many non-empty elements that have opening and corresponding closing tags are:
<ul> ... </ul>
<li> ... </li>
<table> ... </table>
<h2> ... </h2>
<div> ... </div>
<span> ... </span>
<dt> ... </dt>
<dd> ... </dd>
<a href> ... </a>
4. Standalone elements to be closed
Some of the elements are empty or standalone. They do not have associated closing tags and common examples are:
<br>
<img>
<input>
<frame>
<hr>
<meta>
<link>
In XHTML, these elements must be terminated or closed. There are two ways to do that: One way to terminate the element is to put a forward slash / at the end like this:
<br/>
<img/>
<input/>
<frame/>
<hr/>
<meta/>
<link/>
The second way is to add a corresponding closing tag like this:
<br> ... </br>
<img> ... </img>
<input> ... </input>
<frame> ... </frame>
<hr> ... </hr>
<meta> ... </meta>
<link> ... </link>
5. Elements to be properly nested
The elements must be closed in the reverse order. This code is not accepted in XHTML:
<form><table> ... </form></table>
Why is it not accepted!? Simply because, it is improperly nested! As you notice, the form was created first followed by the table and to close them in the proper order, the table must be closed before the form:
<form><table> ... </table></form>
6. Document to have only one root element
In the XHTML document all the codes are nested between <html< and </html<. That's what you call a root element and all other elements or sub elements are in between. The document structure will look like this:
<html>
<head> ... </head>
<body> ... </body>
</html>
7. Attribute minimization is not allowed
In XHTML, all attributes should single or double quoated like this name="value". Even if the value is the same as the name, it cannot be minimized to one word. Here an two examples:
<textarea readonly>Hyperlink Code</textarea>
<textarea readonly="readonly">Hyperlink Code</textarea>
Conclusion
The next time you see an error message on your blog, take a look at your codes and see if it is well formed, well parsed, properly closed, etc. Troubleshoot the problem and try out the possible solutions as you have just learned (hopefully).
Meta Keywords and Description Tags are really important in SEO, especialy when we want our blog / site to be listed within the search engines like google.
In this post you will learn which Meta Tags you will need and also where exactly to place them! Don't worry... it's not as difficult as you may think :)
By default Blogger Page Title is defined by:
1. To make a big story to a short story... simply copy the Meta Tags code from the table below and optimise&change the title/keywors/description into your words.
2. Find <title><$BlogPageTitle$></title> and delete it
4. Paste the new Blogger Meta Tags as seen on the picture below:

5. Finally save the template and you are done !
Also you can check out the post "Blogger XML Meta Description and Keywords" in case you are working on the Blogger XML Template. Have fun.
In this post you will learn which Meta Tags you will need and also where exactly to place them! Don't worry... it's not as difficult as you may think :)
By default Blogger Page Title is defined by:
<title><$BlogPageTitle$></title>
1. To make a big story to a short story... simply copy the Meta Tags code from the table below and optimise&change the title/keywors/description into your words.
<title><$BlogPageTitle$>Page Title of your Blogger</title>
<meta name="keywords" content="Keywords only, ok" />
<meta name="description" content="Short dicription about your blog" />
2. Find <title><$BlogPageTitle$></title> and delete it
4. Paste the new Blogger Meta Tags as seen on the picture below:
5. Finally save the template and you are done !
Also you can check out the post "Blogger XML Meta Description and Keywords" in case you are working on the Blogger XML Template. Have fun.
Blogger Hack for better permalink SEO
The previous post was about a mod Blogger Meta Description - Keyword Tags, which would allow the search eangine to craw through your blog into more sections: Index, Posts, Archives. In this post you will get another simple blogger hack for better SEO !
Search engines like Google love keywords in Title and the URL, but in blogger the file name or the permalink of the post is based on the post Title you give/write. For example if the title is "Blogger Meta Description and Keywords Tags" then the link by default becomes to:
You may think "well I am gonna write many keywords to the Title" but bear in mind that the title length is optimized/restricted to a curtain length - as well as - the Title would look too silly and too boring for the eye catching effect!
Here is a simple solution:
1) Give the post the title with the Keywords coming in first, so if you are writing a post on Blogger Hacks and Templates then make sure to include them in the first 5 words.
2) Publish the post then click edit post.
3) Now change the title to something a little more catchy and publish the post again !
Yep, that's all and you are done!
The previous post was about a mod Blogger Meta Description - Keyword Tags, which would allow the search eangine to craw through your blog into more sections: Index, Posts, Archives. In this post you will get another simple blogger hack for better SEO !
Search engines like Google love keywords in Title and the URL, but in blogger the file name or the permalink of the post is based on the post Title you give/write. For example if the title is "Blogger Meta Description and Keywords Tags" then the link by default becomes to:
http://blogspot.com/blogger-meta-description-and-keywords.html - by removing any special characters.
You may think "well I am gonna write many keywords to the Title" but bear in mind that the title length is optimized/restricted to a curtain length - as well as - the Title would look too silly and too boring for the eye catching effect!
Here is a simple solution:
1) Give the post the title with the Keywords coming in first, so if you are writing a post on Blogger Hacks and Templates then make sure to include them in the first 5 words.
2) Publish the post then click edit post.
3) Now change the title to something a little more catchy and publish the post again !
NEVER STUFF THE TITLE WITH UNNECESSARY KEYWORD WHICH LAND YOU ON THE BAD BOOKS OF SEARCH ENGINE
Yep, that's all and you are done!
Since X, Y, and Z are so common, and the solutions to the problems are often the same, I decided to summarize the most common SEO mistakes, and their solutions, in this article. These SEO mistakes are:
Using a Non-standard Title Element
First, let's define what we mean by a standard title element. Once that concept is clear, serious deviations from the standard will be obvious, and you'll find it easy to correct errors.
A standard title element should:
The logic behind this definition is that spiders only really consider approximately the first 60 characters of a title element. Additionally, they're adept at identifying cases of keyword stuffing, which we'll look at later, and which should be avoided.
... [ Read More ]
- using a non-standard title element
- failing to optimize image markup
- using spider-illegible JavaScript where legible code would do
- failing to indicate the content hierarchy using header elements
- poor grammar and spelling
Using a Non-standard Title Element
First, let's define what we mean by a standard title element. Once that concept is clear, serious deviations from the standard will be obvious, and you'll find it easy to correct errors.
A standard title element should:
- include one or two of a web site's keywords
- include a reference to the page's fundamental content within the first three to five words (It's okay to include variations on one of the web site's keywords.)
The logic behind this definition is that spiders only really consider approximately the first 60 characters of a title element. Additionally, they're adept at identifying cases of keyword stuffing, which we'll look at later, and which should be avoided.
... [ Read More ]
Almost everyone knows how importance the Meta Keywords and Description Tags are in SEO, especialy when we want our blog to be catched from the search engines! There are a lot of Blogger Widgets out there but there is no widget for Meta Tags, is there!?
I did some reasearch about it and came up with some easy mods to optimize the Meta tags for Keywords, Description, Title and even customize for the Index page, post page and archive - nice huh!? Well let's get into it!
By default Blogger gives only the title which is:
That piece of code gives the output as the Title of your blog but it is not really enough to have a good 'catch' from the search engines! The mod is made out of 3 sectors: Index (main page), Item page (the individual post page) and Archives.
1. Copy the SEO Blogger Meta Tag Code from below and customize the words according to your Blog criterias before you paste it to the XML Blogger Template:
2. Log into your Blogger Account -> Template -> Edit HTML
3. Find <title><data:blog.pageTitle/></title> and delete it
4. Paste the new Blogger Meta Tags as seen on the picture below:

5. Finally save the template and you are done !
Also you can check out this post to Avoid making SEO Mistakes and let me know if this made any difference in your result ranking - thanks
I did some reasearch about it and came up with some easy mods to optimize the Meta tags for Keywords, Description, Title and even customize for the Index page, post page and archive - nice huh!? Well let's get into it!
By default Blogger gives only the title which is:
<title><data:blog.pageTitle/></title>
That piece of code gives the output as the Title of your blog but it is not really enough to have a good 'catch' from the search engines! The mod is made out of 3 sectors: Index (main page), Item page (the individual post page) and Archives.
1. Copy the SEO Blogger Meta Tag Code from below and customize the words according to your Blog criterias before you paste it to the XML Blogger Template:
<b:if cond='data:blog.pageType == "index"'><title><data:blog.title/> : Write some stuff about your blog here not too much since only 60 char robot can read</title>
<meta name='Description' content='Describe your blog here since this is what will be shown if your index page comes in a search' />
<meta name='Keywords' content='Key, Words, Here, Dont, go crazy, only, add, relavent, keyword' /><b:else/>
<b:if cond='data:blog.pageType == "archive"'>
<title><data:blog.title/> : Write some stuff about your blog here not too much since only 60 char is all robot read</title><meta name='Description' content='Describe your blog here since this is what will be shown if your index page comes in a search' />
<meta name='Keywords' content='Add, some, more, key, word, here, but, keep, it, sane ' /><b:else/><b:if cond='data:blog.pageType == "item"'><title><data:blog.pageTitle/></title>
<meta name='Keywords' expr:content='data:blog.pageTitle' />
</b:if></b:if></b:if>
2. Log into your Blogger Account -> Template -> Edit HTML
3. Find <title><data:blog.pageTitle/></title> and delete it
4. Paste the new Blogger Meta Tags as seen on the picture below:

5. Finally save the template and you are done !
Also you can check out this post to Avoid making SEO Mistakes and let me know if this made any difference in your result ranking - thanks
Are you a new Blogger User and you got really not much idea how things work?! No worrieeeeees dude that's why you are here :) so have a look around and you will find a lot of useful information/Wigets/TipsTricks/Tutorials etc.
By the way Blogger.com has got its own Help Support Facility where you can get some information about a lot of things!
Just got to this site http://help.blogger.com/
Good Luck
PS: If you got any questions, drop a comment!
By the way Blogger.com has got its own Help Support Facility where you can get some information about a lot of things!
Just got to this site http://help.blogger.com/
Good Luck
PS: If you got any questions, drop a comment!
Adsense is one of the most popular ways to monetize your blog. Two of the most popular Adsense advertising tactics that became widespread last year were:
1. Putting Adsense Ads beside images
2. Blending the design
You earn money on Adsense through clicks. Whenever a visitor clicks on the ad, revenue from advertisers is credited to your account. Putting thumbnail images beside ads increased the overall number of clicks. This works because people often associate the images with the ad and clicked on it.
The latest Adsense blog on images beside ads clarified this rule. You can no longer put images beside Ads.
Another known tactic was to blend the ads with the overall design. Google also frowns down upon this now. One blogger attempted to blend Adsense Ads to the overall design of a Wordpress blog. This is how it looked like:

Upon checking with Adsense support, however, it was found out that this design was unacceptable. From Adsense Support:
Knowing these two tactics are no longer entirely applicable, what’s the workaround? One way is to use Google’s own image ads beside beside text ads. For instance, you can use Google’s Firefox Ad beside Google text ads as follows:

You can also create more distinction between your ads and not blend it too much but still make it prominent on your blog. You must put your ads above the fold - it should be seen by readers once they visit your site. The recommended technique would be to place the Ad in between your text units as follows:
 There is border around the Google Ad to distinguish it from the rest of the sidebar but the eyes are still drawn to it because it is strategically placed between blog post summaries. These techniques are tried and tested.
Try it out yourself and see how it improves your Adsense Clickthrough rate. Enjoy!
1. Putting Adsense Ads beside images
2. Blending the design
You earn money on Adsense through clicks. Whenever a visitor clicks on the ad, revenue from advertisers is credited to your account. Putting thumbnail images beside ads increased the overall number of clicks. This works because people often associate the images with the ad and clicked on it.
The latest Adsense blog on images beside ads clarified this rule. You can no longer put images beside Ads.
Another known tactic was to blend the ads with the overall design. Google also frowns down upon this now. One blogger attempted to blend Adsense Ads to the overall design of a Wordpress blog. This is how it looked like:

Upon checking with Adsense support, however, it was found out that this design was unacceptable. From Adsense Support:
As you may know, publishers may not implement Google ads in a manner that disguises the ads in any way, for instance, by formatting neighboring content to look similar to the ads, or by making ads look like games or forum posts. Additionally, publishers may not attempt to associate specific images with the individual ads appearing on their sites. Such an implementation may confuse users who assume that the image is directly related to the advertiser’s offerings.
Please create greater distinction between the content of your site and the Google ads.
Knowing these two tactics are no longer entirely applicable, what’s the workaround? One way is to use Google’s own image ads beside beside text ads. For instance, you can use Google’s Firefox Ad beside Google text ads as follows:

You can also create more distinction between your ads and not blend it too much but still make it prominent on your blog. You must put your ads above the fold - it should be seen by readers once they visit your site. The recommended technique would be to place the Ad in between your text units as follows:
There is border around the Google Ad to distinguish it from the rest of the sidebar but the eyes are still drawn to it because it is strategically placed between blog post summaries. These techniques are tried and tested.Try it out yourself and see how it improves your Adsense Clickthrough rate. Enjoy!
How to insert Google AdSense into Blogger HTML Template
There so many people that make money & cash out of Blogging and there are a lot of people out there who DO NOT know how to do that! Well I bet you must be one of those who would love to make some extra money with your blog website but you dont know how to insert Google Ads within your blog post because you don't know much about HTML.
No worries, just follow these simple steps to insert the AdSense code into your template:
1. First of all, you need an Google AdSense Account. If you don`t have one already, click here to Apply for GoogleAdsense and after your googleads account has been approved, go into the cpanel and generate the Google Ads code.
2. Sign-in to Blogger, and go to the HTML Edit page

3. Search for the Blogger tag <$BlogItemBody$> . Before this tag, insert the following HTML code: <div style="”float: left”">ADSENSE CODE</div>
Your code should look like this:
4. Replace “ADSENSE CODE” with your GoogleAdsense Code (generated earlier in your Adsense account) and do not forget to click on the “Save Template Changes” button.
Eveything is done, now, go to your blog and check the results.
It should look like the imagine below:

Come back in the next days and read the other tutorials about Adsense.
There so many people that make money & cash out of Blogging and there are a lot of people out there who DO NOT know how to do that! Well I bet you must be one of those who would love to make some extra money with your blog website but you dont know how to insert Google Ads within your blog post because you don't know much about HTML.
No worries, just follow these simple steps to insert the AdSense code into your template:
1. First of all, you need an Google AdSense Account. If you don`t have one already, click here to Apply for GoogleAdsense and after your googleads account has been approved, go into the cpanel and generate the Google Ads code.
2. Sign-in to Blogger, and go to the HTML Edit page

3. Search for the Blogger tag <$BlogItemBody$> . Before this tag, insert the following HTML code: <div style="”float: left”">ADSENSE CODE</div>
Your code should look like this:
<div style=”float:left”>ADSENSE CODE</div><$BlogItemBody$>
4. Replace “ADSENSE CODE” with your GoogleAdsense Code (generated earlier in your Adsense account) and do not forget to click on the “Save Template Changes” button.
Eveything is done, now, go to your blog and check the results.
It should look like the imagine below:
Come back in the next days and read the other tutorials about Adsense.
This is pritty easy! Make a BackUp of your current XML Template so in case anything goes wrong, you always can restore it back at any time.
So now, that's how it works - How to install a Blogger XML Template :
1. Download a Blogger XML Template you like
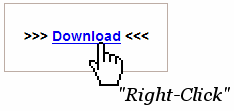
2. Save the XML file on you Desktop
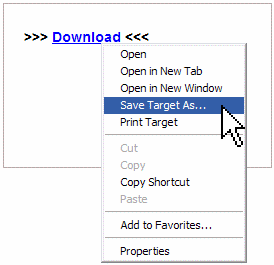
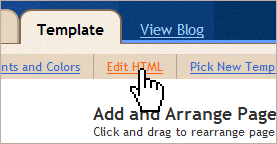
3. Go to Template - Edit HTML
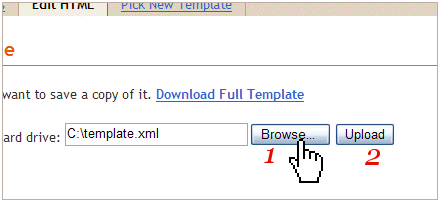
4. Browse to the saved XML file and upload it
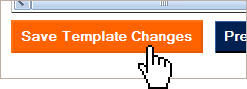
5. Click Save Template
6. You Are Done!
So now, that's how it works - How to install a Blogger XML Template :
1. Download a Blogger XML Template you like
2. Save the XML file on you Desktop
3. Go to Template - Edit HTML
4. Browse to the saved XML file and upload it
5. Click Save Template
6. You Are Done!
This is pritty easy, to be honest with you but before you start to do any changes, it is very wise to make a BackUp of your current Template. That is in case anything goes wrong and you always can restore it back.
So now, that's how it works - How to install a Blogger HTML Template :
1. Download a Blogger HTML Template you like
2. Copy the Source / HTML Code
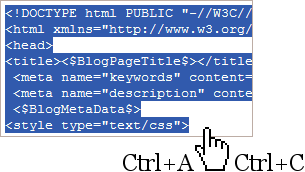
3. Go to Template - Edit HTML
4. Click on Revert to Classic Template
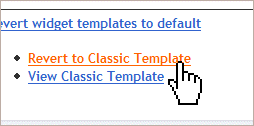
5. Paste the code into the Template area
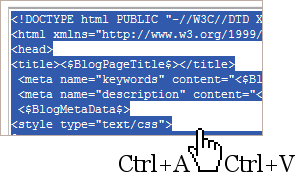
6. Click Save Template Changes
You are all done now :) that was not that difficult, was it?!
So now, that's how it works - How to install a Blogger HTML Template :
1. Download a Blogger HTML Template you like
2. Copy the Source / HTML Code
3. Go to Template - Edit HTML
4. Click on Revert to Classic Template
5. Paste the code into the Template area
6. Click Save Template Changes
You are all done now :) that was not that difficult, was it?!
Blogger XML Templates is the latest updated Blogger version, which is much much better as the HTML version simply because it offers you a wide range of options - Widgets & Add ons & Page Elements etc - it is really cool.
To be honest, trying to make changes on the XML Template may be seen as too chaos and too complicated as a new User (without much of experience) but within a short time even you will get year head around.
Here is a small Introduction:
If you are intrested to know more, go to: http://www.w3schools.com/xml/
To be honest, trying to make changes on the XML Template may be seen as too chaos and too complicated as a new User (without much of experience) but within a short time even you will get year head around.
Here is a small Introduction:
What is XML !?
XML (acronym: Extensible Markup Language)is a markup language for documents containing structured information - both content (words, pictures, etc.) and some indication of what role that content plays (for example, content in a section heading has a different meaning from content in a footnote, which means something different than content in a figure caption or content in a database table, etc.). Almost all documents have some structure.
A markup language is a mechanism to identify structures in a document. The XML specification defines a standard way to add markup to documents.
So XML is Just Like HTML !?
NO! In HTML, both the tag semantics and the tag set are fixed. An <h1> is always a first level heading and the tagis meaningless. The W3C, in conjunction with browser vendors and the WWW community, is constantly working to extend the definition of HTML to allow new tags to keep pace with changing technology and to bring variations in presentation (stylesheets) to the Web. However, these changes are always rigidly confined by what the browser vendors have implemented and by the fact that backward compatibility is paramount. And for people who want to disseminate information widely, features supported by only the latest releases of Netscape and Internet Explorer are not useful.
XML specifies neither semantics nor a tag set. In fact XML is really a meta-language for describing markup languages. In other words, XML provides a facility to define tags and the structural relationships between them. Since there's no predefined tag set, there can't be any preconceived semantics. All of the semantics of an XML document will either be defined by the applications that process them or by stylesheets.
Why XML !?
In order to appreciate XML, it is important to understand why it was created. XML was created so that richly structured documents could be used over the web. The only viable alternatives, HTML and SGML, are not practical for this purpose.
HTML, as we've already discussed, comes bound with a set of semantics and does not provide arbitrary structure.
If you are intrested to know more, go to: http://www.w3schools.com/xml/
Blogger HTML Templates, is also known ans Blogger Classic Templates, is the first Blogger version - which then got updated to Blogger XML. The HTML Templaces are quite easy to modify (when having a bit of HTML & CSS knowledge) but no worries if you got no clue what I am talking about then keep reading!
First, let me give you a small clue about HTML and CSS ... ready?!
PS: Those who know this all - please skip this painfull readin lol
Ohh no no no, hold on dude... this is not it!
There is a lot more to know & to learn, so if you want to get into it then go to: http://www.w3schools.com/html/html_intro.asp and learn something.
If you got any questions, drop a comment :)
First, let me give you a small clue about HTML and CSS ... ready?!
PS: Those who know this all - please skip this painfull readin lol
HTML, an initialism of Hypertext Markup Language, is the predominant markup language for web pages. It provides a means to describe the structure of text-based information in a document — by denoting certain text as headings, paragraphs, lists, and so on — and to supplement that text with interactive forms, embedded images, and other objects.
HTML is written in the form of labels (known as tags), surrounded by angle brackets and can also describe, to some degree, the appearance and semantics of a document, and can include embedded scripting language code which can affect the behavior of web browsers and other HTML processors.
Once again: What is HTML !?
- HTML stands for Hyper Text Markup Language
- An HTML file is a text file containing small markup tags
- The markup tags tell the Web browser how to display the page
- An HTML file must have an htm or html file extension
- An HTML file can be created using a simple text editor
What the F*** - Tags !?
Tags are labels you use to mark up the begining and end of an element. All tags have the same format: they begin with a less-than sign "<" and end with a greater-than sign ">".
Generally speaking, there are two kinds of tags - opening tags: <html> and closing tags: </html>. The only difference between an opening tag and a closing tag is the forward slash "/". HTML is all about elements and YOU label content by putting it between an opening tag and a closing tag.
To learn HTML is to learn and use different tags...
What is CSS !?
CSS (acronym: Cascading Style Sheets) is a style language that defines layout of HTML documents. For example, CSS covers fonts, colours, margins, lines, height, width, background images, advanced positions and many other things.
HTML can be (mis-)used to add layout to websites but CSS offers more options and is more accurate and sophisticated - PLUS - is supported by all browsers today :D
Which benefits will CSS give to You !?
CSS was a revolution in the WWW and the benefits include:
- control layout of many documents from one single style sheet;
- more precise control of layout;
- apply different layout to different media-types (screen, print, etc.);
- numerous advanced and sophisticated techniques.
Ohh no no no, hold on dude... this is not it!
There is a lot more to know & to learn, so if you want to get into it then go to: http://www.w3schools.com/html/html_intro.asp and learn something.
If you got any questions, drop a comment :)
Dear Reader
Welcome and thank you for taking the time to visit Free Templates Blogger!
Free Templates Blogger has been set up for the purpose to offer free Blogger Templates, Blogger Tips & Tricks, Blogger Widgets, Blogger Tutorials etc. Take a minute and have a look around - maybe you will find what you are looking for :)
It would be great if you leave your comments [no insults pls.], so we can find out what you think of and what your opinion is - which then would give us the opportunity to improve the facilities or even to provide new ones.
Hopefully, you enjoy the time while beeing with us.
Thanks
Welcome and thank you for taking the time to visit Free Templates Blogger!
Free Templates Blogger has been set up for the purpose to offer free Blogger Templates, Blogger Tips & Tricks, Blogger Widgets, Blogger Tutorials etc. Take a minute and have a look around - maybe you will find what you are looking for :)
It would be great if you leave your comments [no insults pls.], so we can find out what you think of and what your opinion is - which then would give us the opportunity to improve the facilities or even to provide new ones.
Hopefully, you enjoy the time while beeing with us.
Thanks
Subscribe to:
Posts (Atom)
