English is not the most popular language in the world. In fact, according to many reports, the Chinese language (Mandarin) is certainly the most widely spoken language. In the internet community, the other popular language platforms are arguably Spanish, Russian, Arabic, Albanian, Portuguese, Malay, Italian, French, Japanese, and Korean.
Translation from English to other languages
If you have a blog written in English, it would be also nice to have a Translation Option within your blog for the non-English speaking population. There are many online translation tools, the popular free tools being AltaVista's Babel Fish translation and Google's Language Translator.
For this Language Translation Widget, I have used the Google Language Translator which enables the user to translate English website into Arabic, Chinese, French, German, Italian, Japanese, Korean, Portuguese, Russian, and Spanish. The JavaScript used here can be applied to most of the blogging sites like Blogspot, Typepad and Wordpress.
Language Translation Flags and Script
In your blogger, go to Layout -> Page Elements , click Add a Page Element to the place you want the Language Translation Widget to appear and then click on HTML/JavaScript. Enter a relevant Title such as: Language Translation and paste the following code in the content box:
Points to Note:
- If you want a slightly bigger flag, you can increase the width of the images, for example, width="30" to width="36" and the height="20" to height="24" .
- If a translation doesn't look right, you can always suggest to Google a better translation to help them improve their translation quality.
- If you do not want some translation to appear, then you simply remove that particular code!
EMPTY
Adding a Music Console Widget to your blogger so that the visitors can listen to your music or even to your radio station is a quite good idea, dont you think so!? It is also not as difficult as you may think but no worries, I will show you how:
Navigate to Template -> Page Elements , click Add a Page Element to the place you want the Music Console to appear and then click on HTML/JavaScript. Done so far?! Right, enter a relevant Title such as: Listen to my Music and paste the following code in the content box:
For example, using the following code:
If you like that type of music then go to [ this Site ] for more tunes!
Some explaination:
Note: The Music Console will look different depending which type of Windows Media Player you have and also on the Internet Browser for exmaple Internet Explorer or Firefox. When browsing with Firefox, the Music Console will be played in Apple player. Yep true!
Navigate to Template -> Page Elements , click Add a Page Element to the place you want the Music Console to appear and then click on HTML/JavaScript. Done so far?! Right, enter a relevant Title such as: Listen to my Music and paste the following code in the content box:
<embed autostart="false" height="40" width="300" loop="true" src="URL of music file"/></embed>
For example, using the following code:
<embed autostart="false" height="40" width="300" loop="true" src="URL of music file"/></embed>
If you like that type of music then go to [ this Site ] for more tunes!
Some explaination:
autostart="false" - it does not play the music automatically
autostart="true" - it plays the music automatically
height="40" - the height of the music console
width="300" - the width of the music console
loop="true" - it loops the music once finished
loop="false" - it does not loop the music once finished
src="URL" - the url address of the music to be played
Note: The Music Console will look different depending which type of Windows Media Player you have and also on the Internet Browser for exmaple Internet Explorer or Firefox. When browsing with Firefox, the Music Console will be played in Apple player. Yep true!
Ever wanted to post a [ Quote of a Day ] within your Blog but really knowing how to?! Well, it is not that difficult, all it requires is some JavaScript codes and vuala! Providing, you know what to do ... in this case, copy and paste will work.
The one I will demonstrate to you is a simple JavaScript which stores quotes and authors in a format called “arrays”. We all know a month has got 31 days (well more or less but we stick to 31 days) so within this javascript you can store 31 quotes which will display a new quote every day of the month.
Here we go:
Navigate to Template -> Page Elements , click Add a Page Element to the place you want your Quote of the Day to appear and then click on HTML/JavaScript.
Give it a Title Name and paste the following code into the content box:
A small explanation about the whole script & code:
I have defined a div table for the Quote of the Day to be displayed in with following atributes: 1px solid dark colour border, white background and 5 px spacing. If you do not want the table border to be displayed then there is a way of hidding it by simply replacing border:1px with border:0px and this will not show the border anymore.
Anyhow, you can of course change the border color, background color, spacing and even add other elements/atributes as you wish. If you need a list of color values, then visit the HTML Color Code Chart.
Note: When you type the quotations and names, do not use characters like " or ; and do not press “Enter” within the quotation marks as these are special characters which are used by JavaScript.
The one I will demonstrate to you is a simple JavaScript which stores quotes and authors in a format called “arrays”. We all know a month has got 31 days (well more or less but we stick to 31 days) so within this javascript you can store 31 quotes which will display a new quote every day of the month.
Here we go:
Navigate to Template -> Page Elements , click Add a Page Element to the place you want your Quote of the Day to appear and then click on HTML/JavaScript.
Give it a Title Name and paste the following code into the content box:
<div style="border:1px solid #333; background-color: #fff; padding: 4px; margin-top: 5px; font-weight: bold;">
<script language="javascript" type="text/javascript">
var d=new Date();
var quotes=new Array(31);
var authors=new Array(31);
quotes[0]="If a man watches three football games in a row, he should be declared legally dead.";
quotes[1]="Friendship is far more tragic than love. It lasts longer.";
quotes[2]="Advice is like castor oil, easy enough to give but dreadful uneasy to take.";
quotes[3]="";
quotes[4]="";
quotes[5]="";
quotes[6]="";
quotes[7]="";
quotes[8]="";
quotes[9]="";
quotes[10]="";
quotes[11]="";
quotes[12]="";
quotes[13]="";
quotes[14]="";
quotes[15]="";
quotes[16]="";
quotes[17]="";
quotes[18]="";
quotes[19]="";
quotes[20]="";
quotes[21]="";
quotes[22]="";
quotes[23]="";
quotes[24]="";
quotes[25]="";
quotes[26]="";
quotes[27]="";
quotes[28]="";
quotes[29]="";
quotes[30]="";
authors[0]="Erma Bombeck";
authors[1]="Oscar Wilde";
authors[2]="Josh Billings";
authors[3]="";
authors[4]="";
authors[5]="";
authors[6]="";
authors[7]="";
authors[8]="";
authors[9]="";
authors[10]="";
authors[11]="";
authors[12]="";
authors[13]="";
authors[14]="";
authors[15]="";
authors[16]="";
authors[17]="";
authors[18]="";
authors[19]="";
authors[20]="";
authors[21]="";
authors[22]="";
authors[23]="";
authors[24]="";
authors[25]="";
authors[26]="";
authors[27]="";
authors[28]="";
authors[29]="";
authors[30]="";
document.write(quotes[d.getDate()-1] + '<div style="text-align: right; margin-top:5px; font-style: italic;' + authors[d.getDate()-1] + '</div>');
</script>
<noscript>You need to enable JavaScript to read this.</noscript>
</div>
A small explanation about the whole script & code:
I have defined a div table for the Quote of the Day to be displayed in with following atributes: 1px solid dark colour border, white background and 5 px spacing. If you do not want the table border to be displayed then there is a way of hidding it by simply replacing border:1px with border:0px and this will not show the border anymore.
Anyhow, you can of course change the border color, background color, spacing and even add other elements/atributes as you wish. If you need a list of color values, then visit the HTML Color Code Chart.
Note: When you type the quotations and names, do not use characters like " or ; and do not press “Enter” within the quotation marks as these are special characters which are used by JavaScript.
You would notice under Layout -> Page Elements that there is an option to add a Page Element to the sidebar or even to the footer [depending on your template layout] but there is none for the Header and Blog Posts. Having a Add a Page Element option for the Header and Post is a good thing because it would enable to add a new picture/banner/logo or even to add Google Adsense ad at the top or bottom of your blog posts.
How to do that ?!
Firstly you need to be logged into your blogger account and then navigate yourself to: Layout -> Edit HTML. There you will see a bunch of codes, click & tick the box: Expand Widget Templates then scroll down & or even hit key combination Ctrl + F and search for this code:
Change it to the following:
You wondering what is the difference?! Well, have a proper look and you notice showaddelement='no' and showaddelement='yes' which means no=don't show element and yes=show element! Pretty obvious lol :)
After you have changed that bit, search for:
Change that to:
Now click on Page Elements and you will see the added elements:
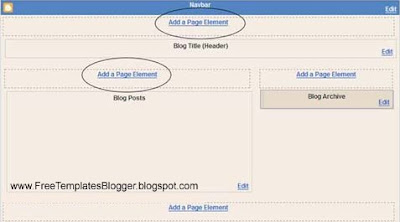
Aditional Add Page Elements
In some blogger templates, the Header is contained in the left sidebar and the main posts appear on the right. In such templates, you can Add Page Elements to the 'main-wrapper' but not at the Header. Nevertheless, you can still look at the guidelines below to Add Page Elements in the 'crosscol-wrapper' part of the template.
To do that, search for <div id='content-wrapper'>
and just below it you see the following:
Change showaddelement to yes:
The code should appear in all new XML Blogger templates but in case you don't see this in your template then you can add the entire code just underneath the <div id='content-wrapper'> section. Now when you view your Layout -> Page Elements, you should see the new added elements as in the picture:
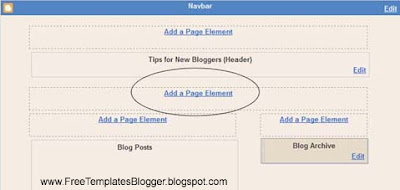
Notes & Infos:
In some blogger templates, the 'header-wrapper' may be called 'header-wrap' or somehting else. In this case you will need to search of it, just search for showaddelement and you figure out the rest.
How to do that ?!
Firstly you need to be logged into your blogger account and then navigate yourself to: Layout -> Edit HTML. There you will see a bunch of codes, click & tick the box: Expand Widget Templates then scroll down & or even hit key combination Ctrl + F and search for this code:
<div id='header-wrapper'>
<b:section class='header' id='header' maxwidgets='1' showaddelement='no'>
Change it to the following:
<div id='header-wrapper'>
<b:section class='header' id='header' maxwidgets='1' showaddelement='yes'>
You wondering what is the difference?! Well, have a proper look and you notice showaddelement='no' and showaddelement='yes' which means no=don't show element and yes=show element! Pretty obvious lol :)
After you have changed that bit, search for:
<div id='main-wrapper'>
<b:section class='main' id='main' showaddelement='no'>
Change that to:
<div id='main-wrapper'>
<b:section class='main' id='main' showaddelement='yes'>
Now click on Page Elements and you will see the added elements:

Aditional Add Page Elements
In some blogger templates, the Header is contained in the left sidebar and the main posts appear on the right. In such templates, you can Add Page Elements to the 'main-wrapper' but not at the Header. Nevertheless, you can still look at the guidelines below to Add Page Elements in the 'crosscol-wrapper' part of the template.
To do that, search for <div id='content-wrapper'>
and just below it you see the following:
<div id='crosscol-wrapper' style='text-align:center'>
<b:section class='crosscol' id='crosscol' showaddelement='no'/>
</div>
Change showaddelement to yes:
<div id='crosscol-wrapper' style='text-align:center'>
<b:section class='crosscol' id='crosscol' showaddelement='yes'/>
</div>
The code should appear in all new XML Blogger templates but in case you don't see this in your template then you can add the entire code just underneath the <div id='content-wrapper'> section. Now when you view your Layout -> Page Elements, you should see the new added elements as in the picture:

Notes & Infos:
In some blogger templates, the 'header-wrapper' may be called 'header-wrap' or somehting else. In this case you will need to search of it, just search for showaddelement and you figure out the rest.
Subscribe to:
Posts (Atom)
